Whether you are looking to learn new songs, teach others, or improve as a bassist, learning to read bass notation is an immensely helpful skill.
One of the biggest regrets of my career is that it took me 7 years of playing til I decided to learn it. I simply didn`t think it was a necessity. It might not be, but I certainly wasn`t prepared for how much learning to read notes would help me improve at the bass.
Since then, knowing how to read standard notation has helped me share my musical ideas with others. It has made me a better composer and a better teacher. Last but not least, it has enhanced my understanding of the bass, as well as other instruments.
At first, reading standard notation for the bass can initially seem overwhelming. That`s why I`ve made this guide for you. I`ve kept it as simple and to the point as possible, while also not skipping out on important details.
Note: Learning to read bass notation requires basic knowledge of where to find notes on the fretboard. If you don`t feel comfortable with this yet, check out my bass guitar notes chart.
The Bass Clef
Bass notation is almost always written with a bass clef. This means that the notes on the lines are always in the same spots. Pianists use both the bass clef and the treble clef, having to navigate two separate ways of reading notes. As bass players, we luckily only use one system.
The bass clef looks like this:

The clef tells us what pitches the lines on it represent. To see how the bass guitar ties into this, here is the full range of a bass guitar with 4-strings and 21-frets displayed on the bass clef:
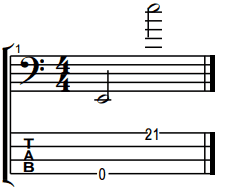
Each line and each space between the lines represents a non-sharp note. This means you will find F on the line with the bass clef, E in the space beneath it, and D on the line beneath that.
Thus, to start with, you only have to consider 7 different notes: A, B, C, D, E, F, and G. This pattern also repeats itself throughout the entire standard notation system. Thus, above every G you will find an A, and beneath every A you will find a G.

This pattern also continues when we add extra lines to the clef. These are called ledger lines and serve the same function as the other lines on the clef. However, they are only added to the mix when they are needed.
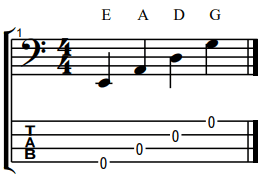
Lastly, a helpful reference point is to know where the open strings of your bass are found on the bass clef. Thus, here`s where you find E, A, D, and G at the same pitch as the open strings;
Navigating the Bass Clef
The bass clef gets its name from the lines in the system representing deep pitches. However, I personally find the Norwegian word for it, “F-Nøkkel” much more helpful. Directly translated, this means “The F-Key”, or more loosely “The F-Staff”.
This is because the clef indicates what line on the staff is an F. When first learning theory, I found this helpful as the F gave me an anchor point on the staff. As a result, I could navigate from it to understand what the other lines on the bass clef meant.
You might for example not immediately know where to find a D on the bass clef. However, since you know where F is, you can know where to find D if you know it is two steps below.
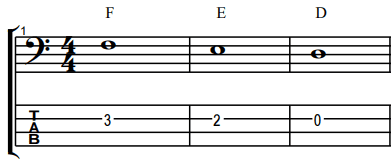
E is thus right below the F. Finding A takes slightly more work as it`s 5 steps below, but you will find it. On the flip side, the A above is easier to find, as you know it is 2 steps above the F key.
As you use this method to find notes, it will become more and more redundant. This is because you will start to remember where to find notes without having to think about it.
Thus, I highly recommend practicing locating notes on the bass clef in this way. Spending just 5-10 minutes with this during your practice sessions will go a long way in quickly making you more comfortable with bass notation.
Note: Due to the bass being a transposing instrument, standard notation is written an octave higher than it sounds. When learning to read sheet music this makes no difference. An E is still an E. The fact that the bass is transposed simply makes sheet music easier to read.
To learn more, check out my article on where to find middle C on the bass.
Sharps, Flats & Key Signatures
Sharps indicate that a note needs to be played one half-step higher. For example, an F# is a half-step higher than F, due to the added “#” symbol.
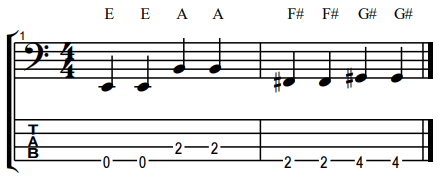
Likewise, a note is played a half-step lower if we add a “b” to it. For example, Gb is a half-step lower than G.
This makes F# and Gb the same note. They ring out at the same pitch and are found at the exact same spots on the fretboard of your bass.
The only difference lies in how we write sharps and flats in sheet music, and whether the musical context implies that we are lowering or raising the note.
In order to remove the sharp from the note we need to use a natural symbol “♮”. This symbol indicates that we should play the note as we would without the sharp symbol.
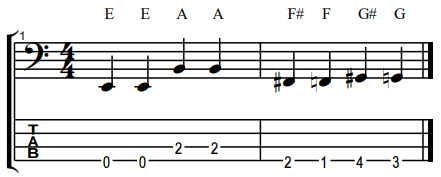
Lastly, what notes are to be considered sharps and flats depends on the key signature.
C Major and A minor are scales with no sharps of flats. Unless stated otherwise, you don`t need to play any sharps or flats.
However, E Major is a scale with 4 sharps. Thus, to make music written in this scale easier to read, the sharps are normally indicated at the beginning of the notation.
As a result, we know that we should read certain notes as sharp unless stated otherwise. In the case of E major these notes are C#, D#, F#, and G#. When the key signature is written in the beginning it looks like this:

Important symbols
There are a number of techniques and effects bassists use besides just plucking notes. These all have their own symbol in sheet music. Here are some of the most important ones:
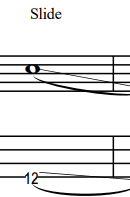
Slides: Shown with a downward or upward line. This indicates that you need to slide your finger across the fretboard to the next note.
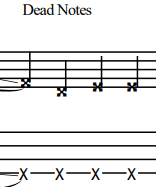
Dead Notes / Ghost Notes: Shown with an X for a fully muted note, or a dead note. Or a parenthesis “()” for a short and muffled melodic note, also known as a ghost note.
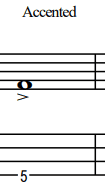
Accents: An accented note is indicated with a “>” underneath it. This means that the note should be played louder and with a noticeable attack.
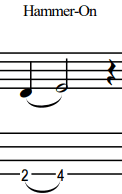
Hammer-ons & Pull-Offs: Marked with a bent line to the next note. The symbol indicates to let go of the string and let the note below ring out naturally if it is a pull-off. A Hammer-on means you need to fret the note without plucking it. The bent line means a hammer-on when ascending a string, and a pull-off when descending it.
Vibrato: Marked with a squiggly line. You can do vibratos by quickly bending the note back and forth.

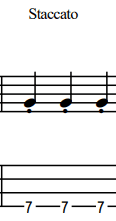
Staccato: Marked with a dot underneath the note. To play staccato means to play notes unsustained. Thus, quarter notes with a staccato symbol can be considered 8th notes with rests between them.
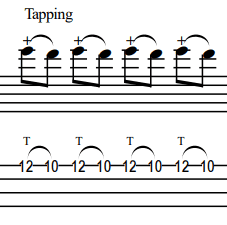
Tapping: Tapping is marked with a “+” sign. Tapping means playing a note by pressing a finger down against the string. This is commonly done using the index finger on your fretting hand. It`s different from hammer-ons because they don`t require you to play a note prior to the tapped one.
Harmonics: Harmonics are marked with a small notehead. While there are several ways to play harmonics, they are most commonly played by gently touching the string without fully fretting it when it’s plucked.

Sight reading
I found the best way to improve my ability to read music while playing the bass was to practice sight reading.
Sight reading means playing music while reading notation in real time. While playing complex bass lines this way is unrealistic at first, simple sight-reading exercises can be extremely useful.
Thus, I recommend playing long sustained notes, as slow as you feel like. What`s important is that you are able to locate the right notes on the fretboard, solely through standard notation.
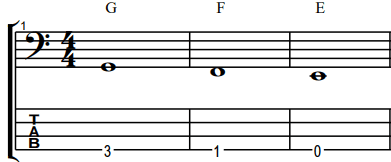
Here`s an exercise you can try. Just focus on playing the right notes at first while disregarding rhythm and speed.

How did it go? Below I`ve added the same bass line with a tab. Thus you can evaluate whether you were on the right track.

I`ve made 2 more exercises of the same kind below that you can use. If you feel comfortable, you can attempt these with a metronome set at a very slow tempo. You can also make these types of exercises on your own by writing out a random string of whole notes and then seeing if you can sight-read them.


And here is what they look like with tabs added.


As you become more comfortable with sight reading, I recommend moving on to my list of easy bass lines. These are harder to sight-read than these exercises but are beginner-friendly enough to sight-read once you have some practice.
Conclusion
While you don`t have to read sheet music to play bass, it sure is helpful.
Thus, while learning to read bass notation can seem overwhelming at first, my hope is that the above information has shown that there is not that much to it.
It will take a while to memorize what notes are found at the different note lines. However, with regular practice and sight reading exercises, this will become second nature in no time.
Navigating sharp and flat symbols can also seem like they make this process harder at first. However, when considering that these notes are parts of a scale, they instead become a helpful tool. For this reason, it is always wise to be aware of what scale you are playing when learning to read sheet music.
As you become more comfortable with this, the next step is to try sight-reading basic songs. This is something to look forward to, for I can tell you from experience that it feels incredibly rewarding once you get the hang of it.
